Philosophy
 We believe that Physical Education is the only subject that has the potential to affect how a person feels every moment of every day for the rest of their life. The greatest responsibility and the BEST thing a physical education teacher can do for their students is to teach them how to stay fit.
Our Foundational Strategies for Functional Training are to train MOVEMENTS, not individual muscles, and to train the body in ALL THREE planes of movement. To strengthen the entire body, you must include; Pushing, Pulling, Rotating, and Lunging/Squatting. When performing these movements, strive for PRECISION in the basic movement before adding PROGRESSION. Once you begin adding progression, there is an incredible VARIETY of movements and tools you can use to continually challenge the body.
The body IS the machine, so build a large menu of equipment-less movements and master those FIRST. Once you have constructed a large base of movements, you can easily add simple equipment such as medicine balls, ABC ladders, and Jungle Gyms to bring progression and variety to your movement challenges.
The brain-body connection DOES NOT WORK in isolation, it recognizes SYNERGIES, so we train to enhance LINKAGE.
Use the tabs above to read more about our three-step philosophy toward personal transformation.
Step 1: Begin Your Transformation
Develop a menu of body weight (no equipment) exercises
The body is the machine!
The human body is a wonderfully made, complex system, that is capable of incredible things that no man-made machine can match. Every person and their body is unique, and we all have the responsibility of taking care of ourselves and unlocking our potential.
Building a menu of equipment-less exercises helps students begin to understand the connectedness of human movement.
Here is an overview of the main areas we use to begin this process…(most of what follows has been taught to us-during our “education” process- by Steve Myrland, our good friend and movement mentor, and Jon Hinds, an incredibly gifted trainer and owner of the “Monkey Bar Gym”)
- Prone Position
- Build the push-up (kneeling plane, inclined plane, kneeling push-up, inclined plane push-up)
- Supine Position
- Build supine plane (crab position, crab w/ one leg extended, supine plane)
- Side Plane (on knees w/ feet behind, on feet-staggered position, on feet-stacked position)
- Build the “squat” (parallel stance, staggered stance, split stance)
- Build the “lunge” (forward, lateral, transverse)
- Begin balance progressions (standing, eyes closed, stepping, bounding)
Mobility (flexibility PLUS strength) Hip rolls, hurdle walks, yoga, etc. - Movement patterns (crawls, marches, steps, skips, shuffles, bounds, jumps, hops, etc.)
You can use all of the above to build your initial fitness circuits, developing a beautiful blend of movements and physical challenges where every student succeeds.
MOST IMPORTANTLY, your students begin to understand the wonderful things their bodies are capable of, without the need for a gym membership, or expensive equipment.
Step 2: Expanding Options
Add simple, effective and durable equipment
Equipment-less exercise is a fantastic way to begin, but it is difficult to achieve certain results without adding simple equipment. For example, building pulling strength is difficult to achieve without a “prop”.
- The BEST TOOL we have ever used for building pulling strength is the Lifeline JUNGLE GYM. The Jungle Gym is an adjustable webbing strap that is very affordable and durable. It can be looped around a pull-up bar, tossed over the back of a basketball hoop or looped over a soccer goal or field-goal post, used over a door, or clipped into a wall mounted bracket or onto a strong chain link fence.As stated and demonstrated on the Jungle Gym portion of our site, there are MANY exercises that can be performed with the Jungle Gym. These should be gradually added to your fitness circuits when your students are ready.
- The Medicine Ball is an incredibly versatile and durable tool that can be used individually, or with a partner or small group. It is a great piece of equipment to build stability, strength, and power in all planes of motion, but especially the transverse plane (where most human movement occurs). The progressions that the medicine ball offers are almost limitless, and the fact that they can be bounced adds a fun dynamic to training.
- The jump rope is probably a staple in most of your circuits already, as it should be. Is there a more cost-effective tool out there for building muscular and cardiovascular endurance while developing rhythm? We think not.
- The ABC agility ladder is a fantastic tool to enhance agility, balance, and coordination. It also provides opportunities to build the brain-body connection, as your students solve the movement “puzzles” given them by the various progressions.
- The MINI-BAND, though not as durable and contains latex, is a great tool for building hip strength and integrity. It is inexpensive, yet provides a nice array of exercises that allow you to train an often overlooked but very important aspect of “core” strength.
- The TRAIN STATION is sometimes included in Step 2, because the Train Station / Jungle Gym combination is a POWERFUL way to build overall strength. I will touch on it more in Step 3, but I mention it here because many schools add the Train Station right away due to its incredible versatility and effectiveness.
Adding these pieces in “station” numbers allows you to add variety to your circuits, which challenges your students in new ways.
You can add one piece at a time in numbers of 3 or 6, or add as many pieces as your budget (and desire level) allows.
Whatever the rate of adding this equipment, make sure you gradually introduce each piece, making sure the students master the basics before taking them up the progression.
Step 3: Building Strength
Add Tubing to Your Resistance Training
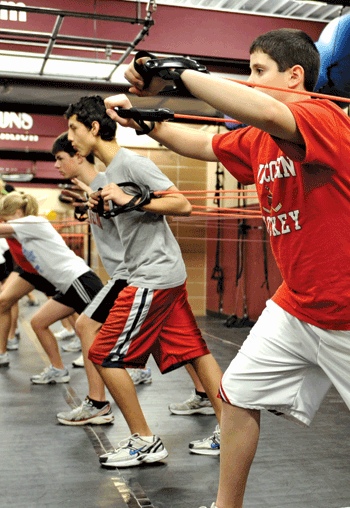
Tubing is an inexpensive and VERY EFFECTIVE way to build overall strength and fitness. There are many types of tubing products on the market, but we have found these Lifeline USA products to be the best available.
- The TRAIN STATION, in our opinion, is the best product for building total body functional strength. The wall strap allows you to vary the training angle, it can be clipped to a fence, and also strapped around (using the door mount strap) a tree or other sturdy structure for outdoor training. The leg cuff and cardio belt accessories allow you to set up your circuits to build hip and leg strength and mobility, and also to train a variety of locomotor movements. The “triple cable pocket” allows you to add up to three cables in each handle, so every person finds the appropriate amount of resistance, and is challenged accordingly.
- The CIRCUIT TRAINER band allows you to train individuals, partners, or groups in a variety of strength and movement patterns, but does not require a permanent attachment point. In physical education classes, it is normally used in partner fashion, since you can train two students with each band. Use it as a station, or get enough bands to train the whole class at once.
- The C-BAND is primarily used for developing core strength, though it may be used for pushing and pulling movements in younger groups of students. The C-band initiates communication between students as they coordinate the movements.
- The PowR Walk enhances connectedness, resistance, and coordination to any movement. It’s great as a station, but is really fun as a class workout. Combine locomotor movements with resistance exercises to create indoor or outdoor fitness courses. The PowR Walk also lends itself to rhythmic exercise, and your students will enjoy creating short workout routines to show the class.
- The PowR Push-up III is our version of the bench press exercise. Instead of being in an artificially supported environment pushing more weight than your joints can handle safely, you rely on your whole body to provide the support to be able to push. There are three slots for bands, and you can use different resistance levels to provide the correct amount of resistance. The progressions are similar to the ones mentioned in the equipment-less section for prone exercises: kneeling plane hold, inclined plane hold, kneeling plane push-ups, and inclined plane push-ups.
Other training accessories can be added as desired, but the tubing equipment listed above provides a virtually endless variety of exercises to develop the whole body in a functional manner.